At the request of several users, we present you a complete tutorial on the application photogenic.
It is an image editing application, available for both the iPhone and iPod Touch at a price of € 3,6 at the AppStore.
photogenic It will allow us to edit, decorate and personalize our images or photos directly from our iPhone / iPodTouch.

Let's see all the options that this incredible application offers us.
Crop mode (CROP) 
In this mode, we can remove the parts that we do not want to be seen in a certain image. When we select this option (by touching the icon you see above) we will see an illuminated rectangle. To change the size of the image, simply stretch or contract the corner points (in blue). Another option is to move the rectangle, dragging it, if we want to cut out another part of the image. When we have selected the area that we want to keep, we will select the option «Cut» (Crop), and everything that is outside the illuminated rectangle will be eliminated from the image.
Rotate mode (ROTATE) 
This mode will allow us to rotate the image in the direction we want. To rotate our image 90 degrees, or simply to create the mirror effect horizontally or vertically, it will be enough to select the corresponding icons:
For Turn right 

For Create the reflection Vertically 
For Create the reflection Horizontally 
Focus mode (SHARPEN) 
With this option we can make our images appear less blurred, improving their sharpness. By dragging the slider located at the bottom of the screen, we can configure the sharpness to our liking. [Don't think that the clearer the better. There comes a point where if the sharpness is too great, the image has "noise"]
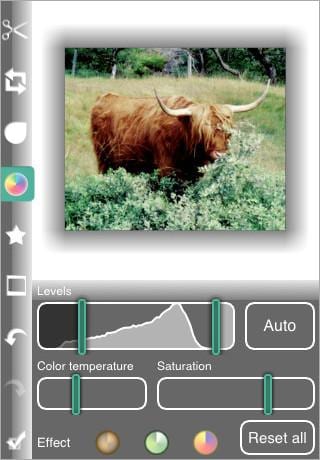
Color Adjustment Mode (COLOR ADJUSTMENTS) 
The Color Adjustment mode will allow us to correct the color balance of the image. We will choose whether to do it manually or automatically. In addition to this, we can add a series of effects to our image:
• Color levels: a color histogram will show us the distribution of colors in the image. If we want to adjust the colors manually, we will simply have to drag the two bars to the left or right. If we want to do it manually, we will simply select "Auto", and that's it.

• Saturation levels: with this option we will control the amount of color in the image. (If we place the slider all the way to the left, we will get a grayscale image)
• Thermostat: with this option we can control the "heat" of the image. If we move the slider all the way to the left, our image will appear "frozen." If we do it to the right, it will appear that it is "hot".
• Special effects: by selecting one of the icons at the bottom, we can apply the effects of: sepia, night vision y heat map, in that order. If we do not like how one of these 3 effects has turned out, simply by pressing the effect button again, we will deactivate it.
Symbols Mode (SYMBOLS) 
This mode allows us to add text bubbles to our images. To add one, just by selecting and dragging the bubble we want to the image, we will have it on it instantly. If we want to edit a symbol that we have inserted into the image, we can do it by "touching" on it once. Once we are editing a symbol, small circles will appear around it. Those circles serve to:
• Enlarge or reduce the symbol
• Change your location
• Change the colors of the symbol
• To edit the symbol text
• To obtain a wider range of colors and text fonts, we can click on the «▼» icon
• To delete a symbol we must press the icon with the 'X', located in the upper left corner.
Frames mode (FRAMES) 
The frames mode will allow us to place a frame around our image. We can select the style of the frame in the list at the bottom.
With the icon 
we can remove the current frame from our image. In the same way as before, if we click on the «▼» icon we can choose a color for our background.
Undo / Redo option (UNDO/REDO) 

As its name indicates, with this two icons we can Undo and Redo previous actions. photogenic It will allow you to undo and redo several actions, and not just one, as it happens in many other programs.
Save option 
If we like how our edited image has turned out, we can save it in the iPhone / iPod Touch photo library. Every time we click on the icon Save , a new copy of the image will be created. This is a very good option, because this way, the original photo will never be modified.
So far the explanation of this impressive photo editing program has come.
I hope you enjoy it. You will already tell us how you get on with it.
Greetings.
thanks people of actualidadiphone! It shows that you take your work seriously. What a very neat tutorial, sir, keep it up!