
When we notice that our computer, be it Mac or any PC, does not go as fast as we are used to or we would like, the first thing we look at is the Activity Monitor. In this application we look at which program is consuming the most resources, something that since the latest versions of OS X we can only check by looking at the CPU consumption. It is common to see in the list of processes one of them called iTunesHelper. And what is that? As the name suggests, it is an "assistant for iTunes".
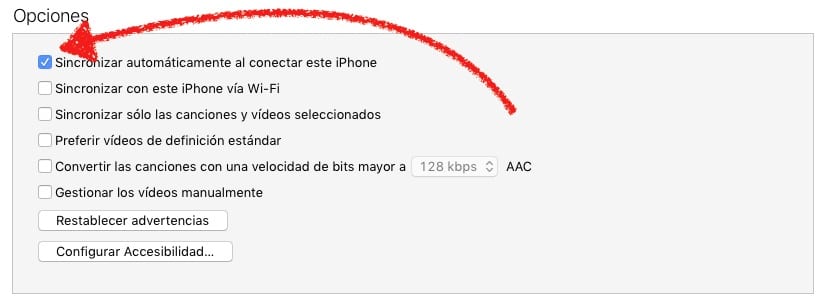
But what assistance does iTunes need? There is a function in the native Apple player that is responsible for constantly monitoring the USB ports. Which search are compatible device connections with iTunes, which are iPhones, iPods and iPads, with the aim of, if we have it configured (by checking the box you see in the following image), open iTunes when connecting one of these devices and start synchronizing automatically. In this article we will try to explain all the details of this assistant that, sometimes, does not make sense to have it activated.
First of all I would like to explain something that some users get wrong: iTunes Helper is not responsible of something that happens when we are browsing, we find a link (for example, from a search engine) to an application from the App Store or Mac App Store, we click on it and iTunes opens or the Mac App Store of OS X. It is something that bothers me, since I prefer to see the information in the browser and, if I am interested, access it manually.
What is iTunes Helper for?
Depends. The first question is: Do I have an iOS device?
- If the answer is "no", I do not need it and it is best to deactivate it, since it is useless.
- If the answer is yes"Well, you have to ask yourself another question: Do I want iTunes to automatically open when my iOS device connects to my computer and start syncing? If the answer is 'no', I don't need it and it's best to disable it. If the answer is "yes", we leave it active.
iTunes Helper is only used for our iPhone, iPod or iPad sync automatically (music, books, etc.) every time we connect it to our computer and, if we have it configured, a backup copy is also made in iTunes.
How to disable iTunes Helper
If we don't need it, it is best to deactivate it. The process is simple and, by the way, we will be able to free up the resources that this iTunes assistant is constantly consuming. We will do it as follows.
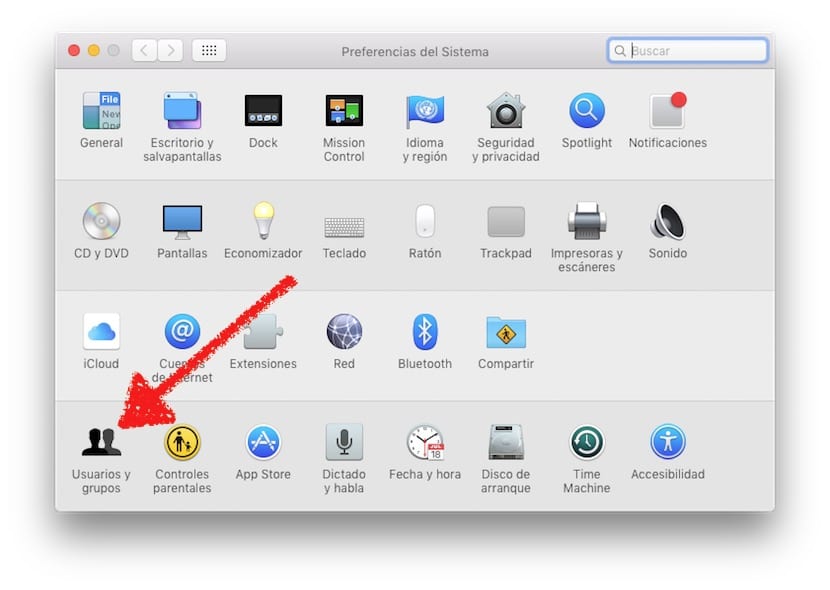
- We open the System Preferences, either from the Dock, from the Launchpad, Applications folder or from the apple in the upper left corner / System Preferences.
- We click on Users and groups.

- Next, we click on Home Items.
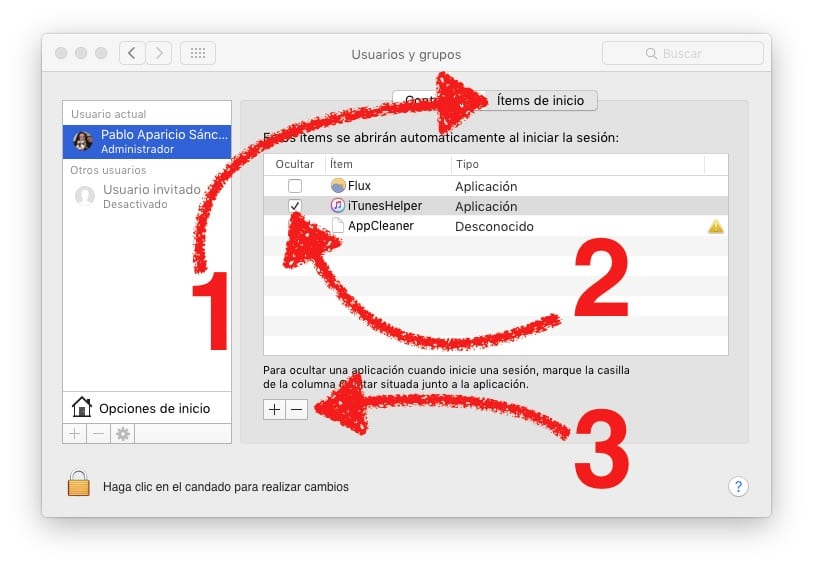
- From what I have been able to see, it is worth making sure that it will not be added to the Starter Items again, so we will do several things. First, we check the box to hide it.
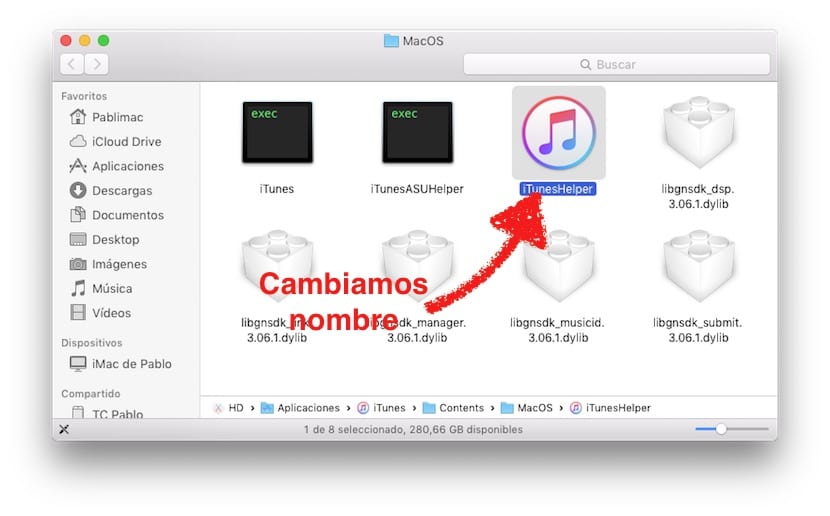
- Next, we right-click and choose Show in Finder. It will take us to the folder where this wizard is.
- Once inside the folder, we change the name. I have put iTunes Helpr on it, only removing the last E.

- Next, we touch on the subtraction symbol (-), which will remove the iTunes Helper from the Home Items.
- Finally, we restart and verify that when we connect our iPhone with iTunes closed, it no longer opens. We can also open the Activity Monitor, search for "helper" or "itunes" and check that it does not appear anywhere. It will have disappeared.
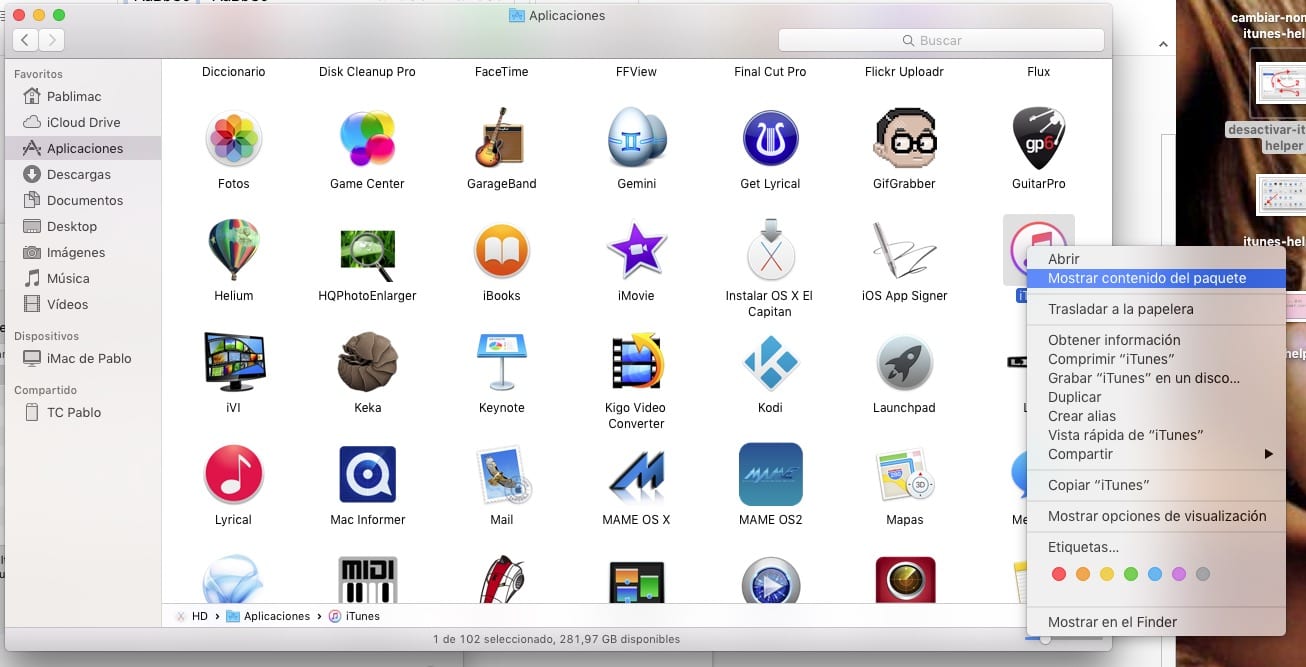
If you want it back, you just have to go to the Applications folder, right-click on iTunes and choose "Show Package Contents", enter Contents / MacOS, rename it to "iTunes Helper" and, finally, drag the icon to the System Preferences window from where we had removed it in step 7 above.
What if I use Windows?
Well, the process is very similar, but the way is, logically because it is a different operating system, different. We will do it by performing the following steps:
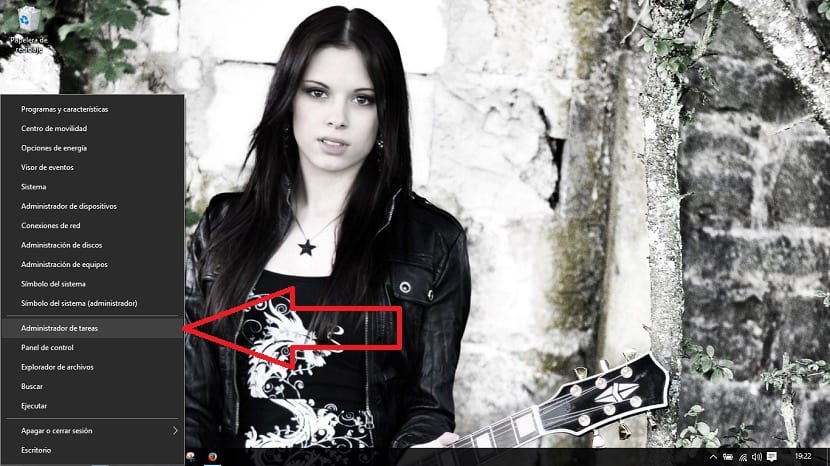
- We right click on the Windows Start icon.
- We select Task Manager.
- When it opens, we choose Home, which is the tab in the center.
- With the pointer over iTunes Helper, we right-click and choose Disable.

- The rest is the same as in OS X: right-click again and click Open file location.
- We rename the file (better to make sure than to let it start again by itself). If we want to return the name, the path where iTunes Helper is located is in C: \ Program Files \ iTunes \ iTuneHelper
- And finally, we reboot.
Of course, at this point I have to confess one thing: I'm not sure how to re-enable it in Windows, since I have been a Mac user for years. I imagine that when you return it to the original name and start it, the iTunes Helper will automatically re-add itself to startup. If it doesn't work and you miss this assistant, you can always reinstall iTunes.

Thanks for the tuto, deleted from the beginning.
Salu2.