
In our previous post we indicated what our HelloWorld application was going to be like and the steps we were going to take to build our application, as well as giving links to required documentation. In this article we start by opening the XCode and we begin to develop.
Step 1. Create the Project.
That is why we open XCode and close (if it comes out), the application's welcome window. Before creating our project, we can enter the XCode preferences. In General -> Layout choose 'All-In-One', at least if you want to be able to compare what you see on your screens with the images you will see.
At this moment we create the project: File -> New Project, and we choose View-Based:

As we indicated in the previous article, for a View-Based XCode project it creates a view linked to a Controller class (remember that we were talking about the MVC pattern). Call the project HelloWorld and save it in the folder you want. You will see something similar to this:
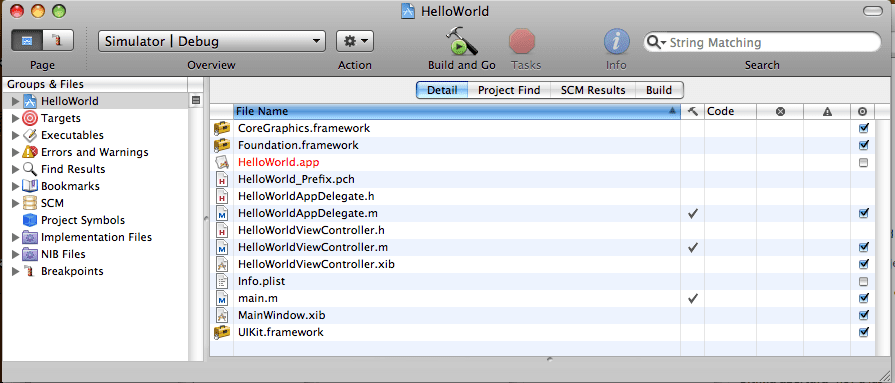
We see that we have several files:
- HelloWorldViewController.h and HelloWorldViewController.m. Both correspond to the controller of our screen. Here will be the logic related to our view; In our case, here must be the code that makes the value of the label change with what is entered in the text box. We see that there is a .h file and another .m. The first is the header, in Java it would be the Interface. Here are the declarations of variables, methods, etc. The .m file is the one that already contains the implementation.
- HelloWorldViewController.xib. ib = Interface Builder. This file is our view, the screen. It is invoked by MainWindow.xib, the main facade of views that we will not touch.
- HelloWorldAppDelegate (.h and .m). We are not going to modify them, it has a pointer to our ViewController.
- Info.plist. It is an XML with information about our application. Here we can for example indicate which is the icon of our application.
Step 2. Design the interface.
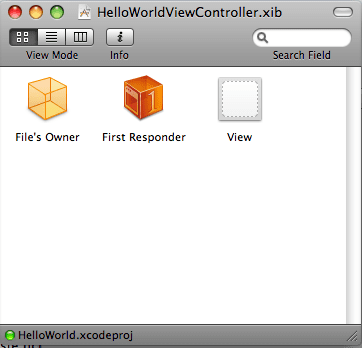
We are going to start "drawing" the screen of our application. To do this, in XCode we double click on the HelloWorldViewController.xib, and we will see that the Interface Builder application opens. First of all, as a practical advice I recommend that you always check that you have the Inspector and Library palettes open. You can open them in the Tools menu of Interface Builder. The Library palette will allow you to add different controls to your view, and the Inspector palette allows you to see the properties of each object and modify them.
We are not going to try to make a pretty application, but to make it work. Begin by locating the screen, labeled View. If it is not open, it is opened by double clicking on View in the following screen:
On the view, drag from the Library palette a TextField above, a Label below and finally a Round Rect Button. We look at it, if we have a control like the TextField selected, we can move the size of this control, relocate it on the screen ... and in the Inspector palette we can have its properties. Selecting the button we can put a Title with value «Change!». In the end we will have something like this:

With this we have defined the interface of our application. It complies with what we had planned: a text box (hereinafter, TextField) where we will enter information. A Label (fixed text) and a button. When we press the button, the Label will show what we have written in the TextField. To do this we will have to create the variables that refer to the Label and the TextField in our ViewController and we will have to indicate to Interface Builder the relationship between the Label and the TextField with these variables. We will also have to create a method in the ViewController that is in charge of updating the Label value with what we have entered in the TextField, and relate the button to that method in Interface Builder. All that will be steps 3, 4 and 5 of our initial script, and will be explained in the next post.
Of course, before finishing I recommend that you look at what appears in the Library palette when you have selected, for example, a TextField to add it to the view:
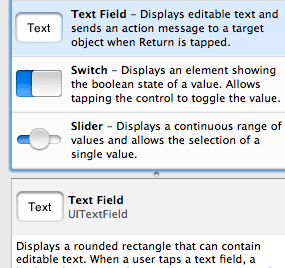
You can see that it explains what the TextField control does, but it also says "UITextField" underneath. This is important, because it is telling us which class in the Cocoa UIKit framework corresponds to this control. This gives us a hint: in order to create the variable that handles this control in the ViewController, it will have to be of type UITextField.
Courage, you are working hard! It looks very good 🙂
Greetings.
Has anyone tried (and succeeded) installing Leopard under vmware to follow this development tutorial?
Or do you all have a mac at home?
Thanks.
Over Here Mac ...
Keep up the good work, I'm already getting the bug to start doing things ...
A lot of information in English, but nothing better than in our native language 😉
Thanks and regards,
@resaka: in my case I use Mac, I'm sorry I can't help you ...
A lot of time is wasted trying to make virtualization work well, I tell you from experience. The best thing is to get a G4 on ebay, install the Leopard, the SDK, some adjustment to make it work under a non-intel processor (in case you don't know, the sdk only works on Mac-Intel 😉) and… guaranteed results. 🙂
TechnopodMan, Javier and Sakery thank you very much for answering. I will keep trying the virtual installation.
Anyway I will look at the option you eat Sakery, since looking at the prices of the G4 they seem not to be very high (between 100 and 300).
Thank you.
Try searching the internet for hackintosh. (EJ IATKOS)
It is used to install MAC OS on PC.
Greetings.