If you have a iPhone 12 Pro or iPhone 12 Pro Max update to iOS 14.3 and you can take photos in the new Apple ProRAW format. A new format that combines Apple's processing system and the zero compression of the RAW format.
Without a doubt, good news for photography lovers. But you have to be careful, and not use it crazy. Just because each image occupies ten times more than a conventional JPG, between 25 and 40 MB. So we will use it now to make the relevant tests, and in very specific cases that we know that we will have to edit these photos. Let's see how it is used.
This Monday Apple has released iOS 14.3 for all its users. One of its novelties is the incorporation of the possibility of saving your photographs in a new format called ProRAW on the iPhone 12 Pro and 12 Pro Max.
The name already gives you a clue of what this new format represents. Provides the traditional benefits of RAW format, but it also includes Apple's iPhone image processing. A very interesting option, without a doubt.
This new way of saving the captures, uses the universal DNG file format. That means the file sizes for RAW or in this case ProRAW images are much larger than HEIF / JPG compressed images. Apple says that most ProRAW images taken on the iPhone 12 Pro will be around 25MB (about 10 times larger than HEIF / JPG), but can go up to 40MB.
The great benefit of ProRAW is that an uncompressed image is being saved with all the data that the iPhone 12 Pro's camera system can provide. That means you have much more flexibility when editing that capture.
Part of that is the 12-bit color support (compared to 8-bit), which at first glance doesn't seem like much of a difference, but is actually a jump from 256 RGB shades to 4.096. But along with all of that, you still get the impressive computational photo processing that the iPhone 12 Pro range brings you.
How to use ProRAW on iPhone 12 Pro and iPhone 12 Pro Max
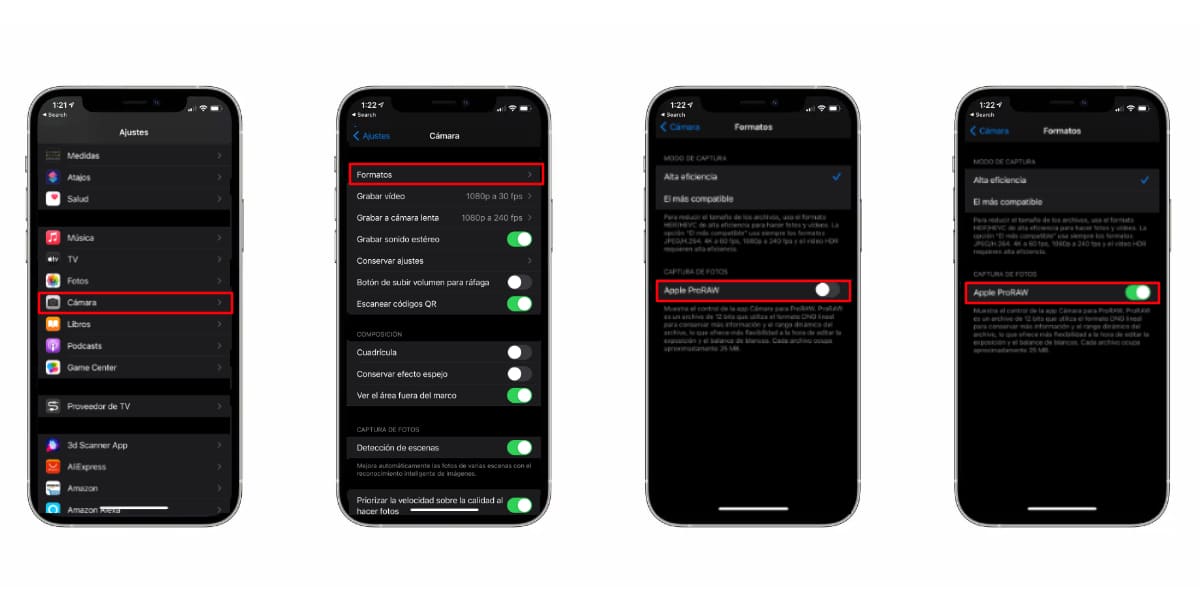
You must enter Settings and enable the ProRAW option in the camera.
The first thing you should do is enable the ability to save in ProRAW from iPhone Settings.
- Sign in Settings.
- Pull down and click Camera.
- Press on Formats, above all.
- Activate the option Apple ProRAW.
Now it shows you how one more option of the Chamber. Due to the excessive consumption of storage, it is disabled by default, with the RAW icon crossed out in the upper right.

This is the disabled RAW icon that will appear on the Camera application screen.
- With the Camera app open, tap on the crossed-out RAW icon.
- RAW will appear without the line that crossed it. It means that the photo you take will be saved in ProRAW format.
- They will be saved in the RAW tag of the Photos application.
- Don't forget to deactivate ProRaw when you finish your photoshoot, if you don't want to run out of storage.