
En our previous article We had included a Label, a TextField and a Button in the interface of our application. We wanted the content of the Label to be updated with what was entered in the TextField when clicking on the Button. We had (step 1) created the project, and (step 2) used InterfaceBuilder to define the screen. Now we will continue with the rest of the steps to leave the application working.
Step 3. Create variables in the ViewController.
We have our interface correctly. In fact, if we did Build & Go we could see how we are doing:
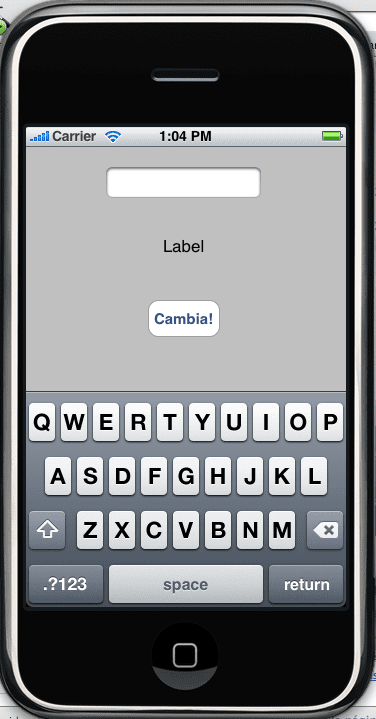
But obviously nothing happens when pressing the button, because we have not made the minimum essential developments. In this step 3 we are going to introduce the variables and methods in the HelloWorldViewController, both in the interface (.h file) and in the implementation (.m file). To do this, as we indicated at the end of the previous post, we have to know that the TextField corresponds to a UITextField class, and the Label to a UILabel class. These 2 classes are within the UIKit framework.
If we have not closed and saved Interface Builder, we do it and in XCode we open the file HelloWorldViewController.h. The code right now will have something like this:
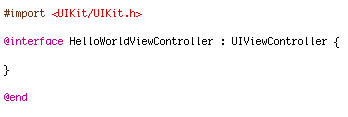
We are already looking at some Objective-C. In this code we see an import declaration of the UIKit library, where the UILabel and UITextField classes are. We see how the interface is declared, and that it extends from the generic UIViewController of UIKit.
Within the interface code we include the following code:

We can now explain what we have done:
- We have declared within the @interface block 2 attributes of type UILabel and UITextField, with 2 variable names * label and * textField respectively. Ahead appears IBOutlet. What is all this? We explain ourselves. IBOutlet is not a type of variable; is a directive that helps Interface Builder to know the existence of these variables of type UILabel and UITextField. By the way, remember that in the previous article we had given you a trick to know the variable types of the control objects (buttons, label, text field, etc.) in Interface Builder. On the other hand, the issue of * in front of the variable name may surprise Java programmers, not so much those of C ... but learn that this is how you will write instance variables in Objective-C.
- The UILabel and UITextField properties are declared. nonatomic and retain we will not see for now, it is related to memory management.
- We see that we declare a method, updateText. It has a - sign in front of it, indicating that it is an instance method, and not a class method (a + sign is explained for them). We cannot go into explaining this because this is basic object-oriented programming ... That method does not return anything (that is, void) and receives a parameter of type id. Basically it refers to the identifier of the object that will cause the call to our updateTexto method, which will update the value of the label. We can guess since that control will be the button itself ...
Once this is done, we are done with step 3.
Step 4. Bind View Controls to Controller Variables.
If we review, on the one hand we have developed our interface with Interface Builder, and on the other we have the variables related to those controls in the HelloWorldViewController.h (interface of the HelloWorldViewController.m controller class). However, there is still no relationship between the view and the controller, that is, we have not given any instructions to relate, for example, the text field that we design in Interface Builder with the variable of type UITextField that we have put in the class . Now we are going to do this task. We open Interface Builder again by clicking on HelloWorldViewController.xib, click on the text box, and in the Inspector palette we go to the second tab (Text Field Connections). We see that there is a section called Referencing Outlets, without there being anything marked. That means that at the moment Interface Builder does not know any relationship between this text field and an IBOutlet (Interface Builder Outlet) of a class ... but we have a UITextField IBOutlet in our HelloWorldViewController, so we are going to link it.
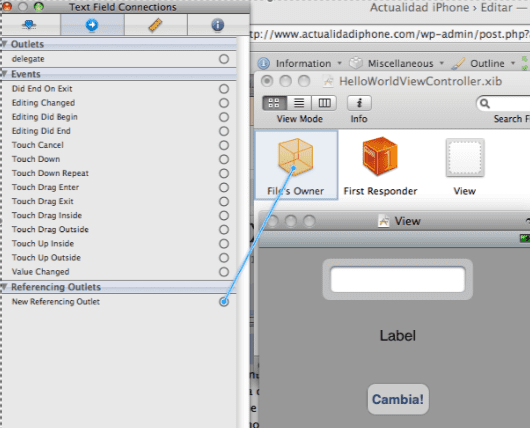
To do this, as we see in the figure, by clicking on the small circle next to «New Referencing Outlet», we drag to the File's Owner of the window called HelloWorldViewController.xib. It will let us choose 2 options, view (the full view) and textField (our variable). Obviously we choose textField, and thus we relate our text box to the variable of its type UITextField. By the way, the File'sOwner or owner of the file is neither more nor less than our controller class ...
We repeat the operation with the label, relating it to our controller variable label. And with the button, it is something different. In this case we are going to relate it to our updateTexto operation, but for a specific event. Do this with the 'Touch Up Inside' event, and choose our updateTexto method:

And in this way we already have related the controls that we had defined with Interface Builder and the variables that we have put in the controller. We close Interface Builder saving everything and we go to the last step returning to XCode.
Step 5. Latest developments.
In XCode we open the HelloWorldViewController.my and we put the following code so that our class looks like this:
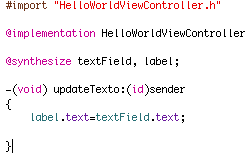
If we look closely we have simply put the block @synthesize, and the implementation of the method declared in the interface .h, updateTexto. Below that code you will have a lot of commented code.
The @synthesize line does something similar to generating the typical getter / setter (accessors / mutators) typical in OO languages (encapsulation). We need them so that the controller reaches the content, for example, of the text box.
The updateTexto method, as you can see, simply updates the text of our label with the content of the text field. We are done.
Now, we simply do Build & Go, and you will see that by entering a text string and clicking on the button, the content of the label is updated. In the next article we will introduce improvements to our application.
Very good tutorial, very clear and simple.
Well, I must be very melon 🙁 because it doesn't work for me. I have captured the value in a String and it takes the text but it does not assign it to the label, at least it does not paint it, because I try to see the label.text and it tells me out of scope ...
Excellent your tutorials, it really explains very well this development for iphone, I hope you continue to publish more tutorials.
regards
Hi, all cool, but it doesn't work. To make it work I had to link the view of the interface builder with the view in the cube, as you teach to do with the textfield and the label. For the rest, thank you very much.