
HomeKit opens up a world of possibilities for you with the enormous advantage that Apple's home automation platform allows the accessories you add to interact with each other with absolute compatibility with each other, no matter what brand they are. If we add to this the possibility of creating automations, remote control and voice control via Siri on any of Apple's devices, the result is an ideal ecosystem for any Apple user.
But it also has its restrictions, and that is that not all manufacturers bet on HomeKit, either due to hardware limitations, software limitations or simply because Apple does not allow it. This is where Homebridge comes in, a perfect alternative for those devices that officially do not allow compatibility with HomeKit. Do you have devices that are not compatible with HomeKit and would you like to add them to the Apple platform to take advantage of their possibilities? Well, here we explain how you can do it using the process for add our LG television to HomeKit, and we do it in this tutorial with images and in the video that you can see below.
Choose the right server
HomeBridge is software that can be installed on any device that allows it, be it a computer (Windows or Mac), a Raspberry, a NAS… You just have to choose where to do it to choose the right option when installing it. I would say that the only requirement you have to take into account is that ideally it would always be on, because if you turn it off, your devices will stop working with HomeKit. In my case, I will choose the only device that I always have on, without exception: a QNAP NAS.
The procedure it is very similar on NAS Synology or any Mac or Windows computer, only a few of the steps can be varied during the HomeBridge installation, but adding accessories is virtually the same for all devices. Read the steps carefully with the help of the video that accompanies the article and then you will only have to find the exact procedure for your specific device.
Installing HomeBridge on your QNAP NAS
To install HomeBridge on our QNAP NAS we must install the Container Station application that we can download from the application store (App Center). You can search for it in the App Center in the category "Utilities" or in the magnifying glass on the upper right, search directly for "Container Station". We click on the install button and wait for it to download and install on our QNAP.
We will then run the newly installed application and wait for it to carry out the necessary tasks such as creating the directory where all the components it needs will be installed and which we will hear adding in the next steps. This first time we run it, it will take a while to open, so be patient and do not interrupt the process at any time.

We already have the place where we are going to install HomeBridge, for which we must find it by clicking on «Create» on the left side of the menu. In the search box we write «HomeBridge» and several results will appear. I have chosen the "oznu / homebridge" package for my process because it is the one recommended in most guides. Click on the "Install" button on the right and continue with the procedure. When it asks us which version to install, we choose "latest" and we accept the rest of the windows that appear.
In the next step we will be asked for the details to create the container. We can change the name if we wish, or leave the one that comes by default (I have put QBridge in the images and video). What we must do is click on «Advanced Settings» to configure some necessary elements:
- Environment: DNS_HOSTNAME / JUPITER
- Network: we choose «Bridge» mode
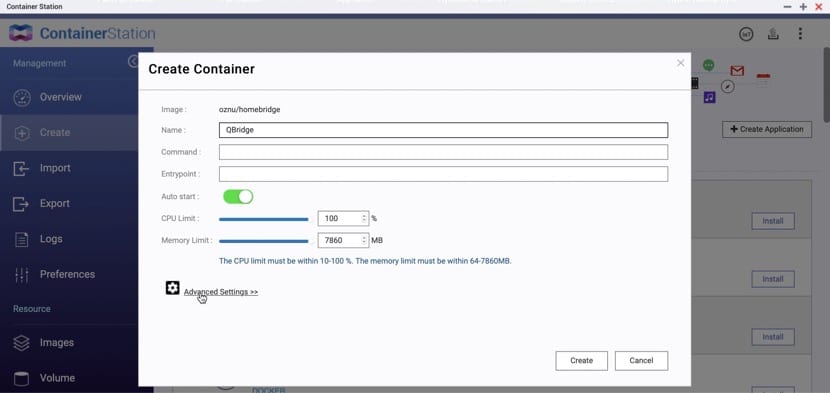
We click on «Create» and we wait for the process to be carried out. Once finished we go back to the left tab «Overview» and we can now check that our container «QBridge» (or whatever you have called it) is running. If we click on its name we can see in the terminal that everything is going well, we will even have the code to scan it with our iPhone and add it to HomeKit, but we will wait to finish the entire tutorial to do it.
Add our LG TV to HomeKit
Once HomeBridge is installed, what we have to do is add those devices that we want to include unofficially to our HomeKit network. In this case, and taking advantage of the article in which I talked about how to manage your LG television using HomeKit (link) we are going to explain how to add a device using the «HomeBridge-webOS-TV» plugin to add my LG TV. The steps are the same for the plugin that you want to add, and the configuration details of each one are explained on the plugin's website.
Where do we find those plugins? There are many websites where you can find them, but GitHub and above all, npm are the ones that I recommend. In the specific case of the plugin for LG televisions, the web link is this, and there you can see all the necessary data for both its installation and its configuration.
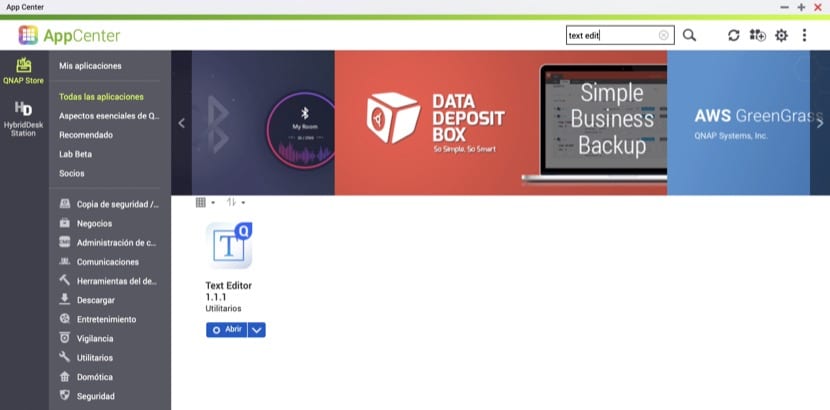
The first thing we are going to do is download an application that we will need to edit the configuration files. We access the AppCenter of our QNAP again and look for the application «Text Editor», and we install it. It is an editor that will allow us to modify and add the necessary lines in the configuration file so that everything works as it should.
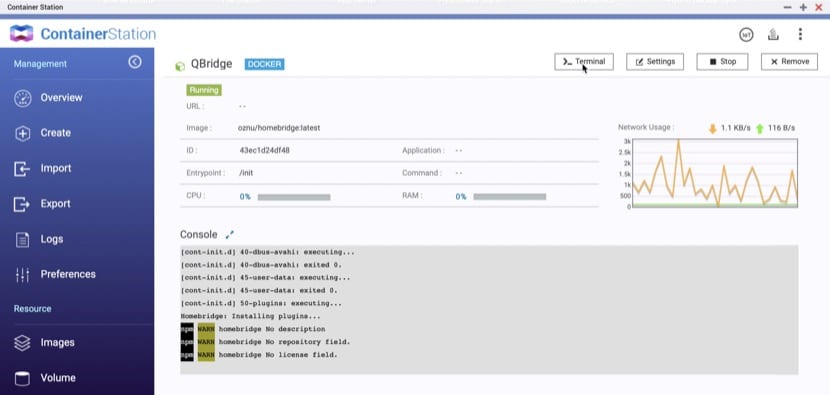
Now we access our QBridge container again, and click on the «Terminal» button to begin with the installation of the plugin. In the window that opens, write the command "/ bin / sh" (without the quotes) and the terminal window will open. There we have to write the command that appears on the web that I indicated before (npm install -g homebridge-webos-tv) and press Enter to start the plugin installation process. When it's done you can close that window.
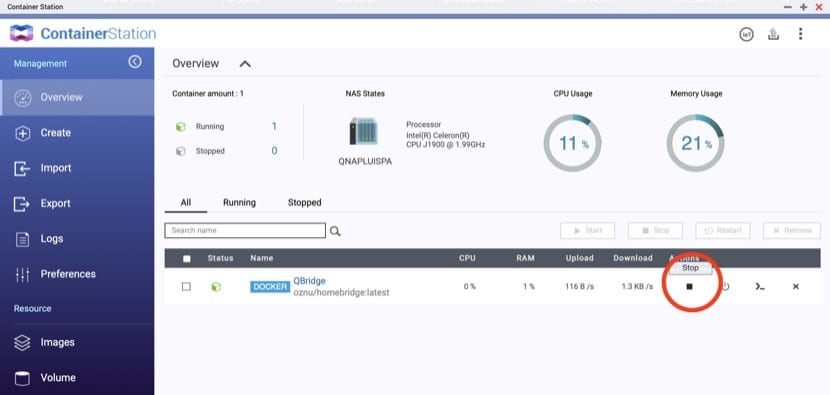
Now is the time to edit the plugin configuration file, and for this we have to stop the container. On its main screen, click on the «Stop» button, and then we can go to the path where the configuration file is to edit it. The route is «container> container-station-data> lib> docker> volumes> 52cc5958…> _data"So we use the File Station application of our QNAP and navigate the entire route that I have indicated until we reach the" Config.json "file which is the one that we will have to open with the" Text Editor "application.
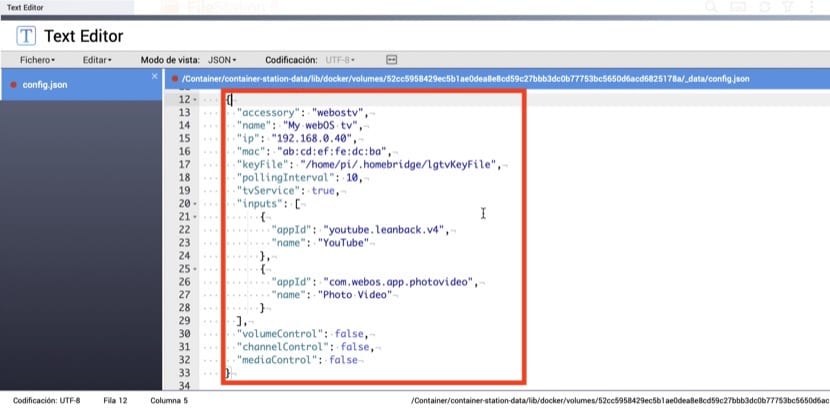
We are now reaching one of the most delicate steps of the entire process, because it depends on whether everything works well or not. We must insert the code that we find on the plugin website (again I give you the link here) in the right place. The place is exactly below where we read "accesories": [and we must copy all the code between the two {} as shown in the image in the inset.
Once the code is pasted, some parameters have to be modified:
- "Name": "My webOS tv" you can change the name of My webOS tv to whatever you want
- "Ip": "192.168.0.40" you must change the ip for the one on your television
- «Mac»: »ab: cd: ef: fe: dc: ba» you will have to change the MAC for that of your television
This is what is required for everything to work. There are other configuration options to add volume control, channels ... Take a look at the plugin's website where they explain all the configuration options. Once finished, click on "File> Save" and close the Text Editor application.
Now the time has come to access the main screen of our QBridge container again and restart it (we had stopped it in the previous step). We access Terminal with the button on the right of the window and wait for everything to finish and a QR code appears on the screen. That is the code that we have to scan with the Home application of our iPhone so that it is added to HomeKit, as if it were any other HomeKit accessory. If you've followed the steps correctly, the new accessories should appear on your device's screen. When you add new accessories to Homebridge they will automatically appear on your iPhone and the rest of the devices you have with the same account.
Hello, I have a Mac Mini from 2009, therefore I cannot install XCode, is there any possibility of installing homebridge?
Thank you!!
In all the methods that I have seen you have to install Xcode ...